Google’s Gemini 2.5 Flash Image is built for fast, flexible image generation and editing. It brings conversational edits, multi-image mixing, readable on-image text, and character consistency into one workflow you can use in real projects.
Most image models are great at first drafts, weaker at revisions. This guide shows how Gemini 2.5 Flash Image closes that gap so you can iterate, art-direct, and deliver consistent assets without starting from scratch each time.
What you’ll learn
- Setup in minutes, including API keys, environment, and a minimal test call.
- Prompt patterns that travel, from product shots to portraits to UI mockups.
- Conversational editing, like “brighten the key light” or “swap the jacket to navy.”
- Multi-image composition, blending up to three sources to create a new scene.
- Character consistency, keeping faces, outfits, and styles steady across shots.
- High-fidelity text, placing crisp typography directly inside images.
- Cost control, estimating token use and budgeting for large batches.
Note: Gemini 2.5 Flash Image uses token-based billing. As an example calculation, if one image consumes roughly 1,290 tokens, at a rate of $30 per million tokens, the effective cost would be about $0.039 per image. Always check your dashboard for current rates and usage.
According to [source, year], internal benchmarks using the “nano banana” label emphasized editing strength and speed compared with prior releases.
In the next section, we will set up your environment, run a smoke test, then build prompt and edit recipes you can reuse across projects.
Access nano banana for free
You can try Gemini 2.5 Flash Image without the API by signing in with your Google account. Use the model in Gemini or in Google AI Studio. When you use it through Gemini chat, images include a watermark. AI Studio is better for testing clean outputs and managing runs.
Tip: Use AI Studio to explore capabilities and save prompts. Move to the API when you need reproducible pipelines, version control, and consistent assets without watermarks.
Security: Never paste credentials into chat sessions or screenshots. Treat API keys like passwords and rotate them regularly.
Getting started: environment setup
Before generating images by code, set up a clean Python environment and authenticate safely.
The steps below use UV for dependency management and a .env file for secrets.
Prerequisites
- Python 3.9 or newer. Confirm with
python --version. - UV package manager for fast, isolated installs.
- Google account to access AI Studio and create an API key.
Get your API key
- Open Google AI Studio’s API key page and sign in.
- Select Get API Key in the left panel.
- Choose a project: create a new one if you are just starting.
- Copy the generated key immediately, you will not see it again.
- Store it securely for the next steps.
Projects help separate usage, quotas, and billing. Use a dedicated project per app or team to keep limits and audit logs clear.
Create the project folder
# Create project directory
mkdir gemini-image-tutorial
cd gemini-image-tutorial

# Initialize UV project
uv init

# Add required packages
uv add google-genai python-dotenv pillow
Package roles:
- google-genai connects to Gemini models and handles requests.
- python-dotenv loads secrets from a local
.envfile. - pillow reads and writes image files during tests.
Secure your API key
# Create an empty .env file
touch .env

# Ignore secrets and build artifacts
echo ".env" >> .gitignore
echo "__pycache__/" >> .gitignore
echo "*.pyc" >> .gitignore
GEMINI_API_KEY=your_api_key_here
Keep .env out of version control. In CI, set GEMINI_API_KEY as
an environment variable in the runner’s secret store rather than committing files.
Test your setup
import os
from dotenv import load_dotenv
from google import genai

# Load environment variables from .env
load_dotenv()

# Initialize the client with the API key
client = genai.Client(api_key=os.getenv("GEMINI_API_KEY"))

# Simple smoke test (text) to confirm auth and connectivity
try:
  response = client.models.generate_content(
    model="gemini-2.5-flash",
    contents="Say hello in exactly 3 words"
  )
  print("✅ Setup successful!")
  print(f"Response: {response.text}")
except Exception as e:
  print("❌ Setup failed:")
  print(f"Error: {e}")
uv run python test_setup.py
A successful run prints a short three-word greeting and confirms your environment is ready. If it fails, use the checklist below.
Common fixes
- API key not found: Ensure
.envcontainsGEMINI_API_KEY=…and you calledload_dotenv(). - Invalid API key: Recopy the full key from AI Studio. Remove stray spaces or quotes.
- Quota exceeded: Wait for reset or review usage in AI Studio, then reduce request rate.
Know your free-tier limits
Free keys include modest rate and daily limits that are sufficient for this tutorial and small experiments. Check AI Studio’s usage dashboard for your current allowances, resets, and detailed logs.
For teams, assign separate projects per environment (dev, staging, prod) to prevent one workload from exhausting another’s quota.
Generate your first image
With your environment ready, you can create a first image using Gemini 2.5 Flash Image. Start with a clean script, a precise prompt, and a simple save routine so you can verify output quickly.
Set up imports and the client
import os
from io import BytesIO
from dotenv import load_dotenv
from google import genai
from PIL import Image

# Load environment variables from .env
load_dotenv()

# Initialize the Gemini client (ensure the variable name matches your .env)
client = genai.Client(api_key=os.getenv("GEMINI_API_KEY"))

# Choose the image model
MODEL = "gemini-2.5-flash-image"
The client manages authentication and requests. The Pillow library (PIL) handles image decoding and saving.
Keep the model name in a constant so it is easy to reuse across scripts.
Write a focused prompt
# Describe a single, concrete scene with style and constraints
prompt = (
  "Studio product photo of a small 'nano banana' wireless mouse on a matte slate desk, "
  "soft top light, subtle reflection, 3/4 angle, high detail, neutral palette, 1024x1024"
)
Good prompts specify subject, setting, lighting, camera angle, and aesthetic. Avoid long stories for your first run.
Request an image from the API
# Ask Gemini to create the image
response = client.models.generate_content(
  model=MODEL,
  contents=[prompt]
)
The generate_content call returns a response that may include multiple parts, such as text or images.
You will extract the first inline image payload below.
Extract and save the image
# Find the first inline image and save it to disk
saved_path = None

for part in response.candidates[0].content.parts:
  if getattr(part, "inline_data", None) and getattr(part.inline_data, "data", None):
    img_bytes = part.inline_data.data
    image = Image.open(BytesIO(img_bytes))
    saved_path = "nano-banana_first.png"
    image.save(saved_path, format="PNG")
    print(f"✅ Image saved: {saved_path}")
    print(f"📏 Size: {image.size}  🎨 Mode: {image.mode}")
    break

if not saved_path:
  print("⚠️ No image payload found. The model may have returned only text. Check your prompt and model name.")
This routine scans the response parts, converts the bytes to a Pillow image, and writes a PNG file you can inspect locally. Printing size and mode confirms the decode worked.
Complete script (copy, run, verify)
import os
from io import BytesIO
from dotenv import load_dotenv
from google import genai
from PIL import Image

# 1) Auth
load_dotenv()
client = genai.Client(api_key=os.getenv("GEMINI_API_KEY"))

# 2) Model + prompt
MODEL = "gemini-2.5-flash-image"
prompt = (
  "Studio product photo of a small 'nano banana' wireless mouse on a matte slate desk, "
  "soft top light, subtle reflection, 3/4 angle, high detail, neutral palette, 1024x1024"
)

# 3) Generate
try:
  response = client.models.generate_content(model=MODEL, contents=[prompt])
except Exception as e:
  print("❌ Request failed:")
  print(e)
  raise

# 4) Extract first image
saved_path = None
try:
  for part in response.candidates[0].content.parts:
    if getattr(part, "inline_data", None) and getattr(part.inline_data, "data", None):
      img_bytes = part.inline_data.data
      image = Image.open(BytesIO(img_bytes))
      saved_path = "nano-banana_first.png"
      image.save(saved_path, format="PNG")
      print(f"✅ Image saved: {saved_path}")
      print(f"📏 Size: {image.size}  🎨 Mode: {image.mode}")
      break
  if not saved_path:
    print("⚠️ No inline image found in the response.")
except Exception as e:
  print("❌ Parse/save failed:")
  print(e)
What to expect
- Default outputs are PNG files suitable for quick review and iteration.
- The response may also include text guidance about the generation.
- If you test through consumer chat surfaces, images may include a watermark; API results are for programmatic use.
Troubleshooting: If you see key or quota errors, verify GEMINI_API_KEY is loaded, the model name is correct, and your rate is within limits.
For reproducibility, keep prompts deterministic and log model/version alongside outputs.
Try varied prompts
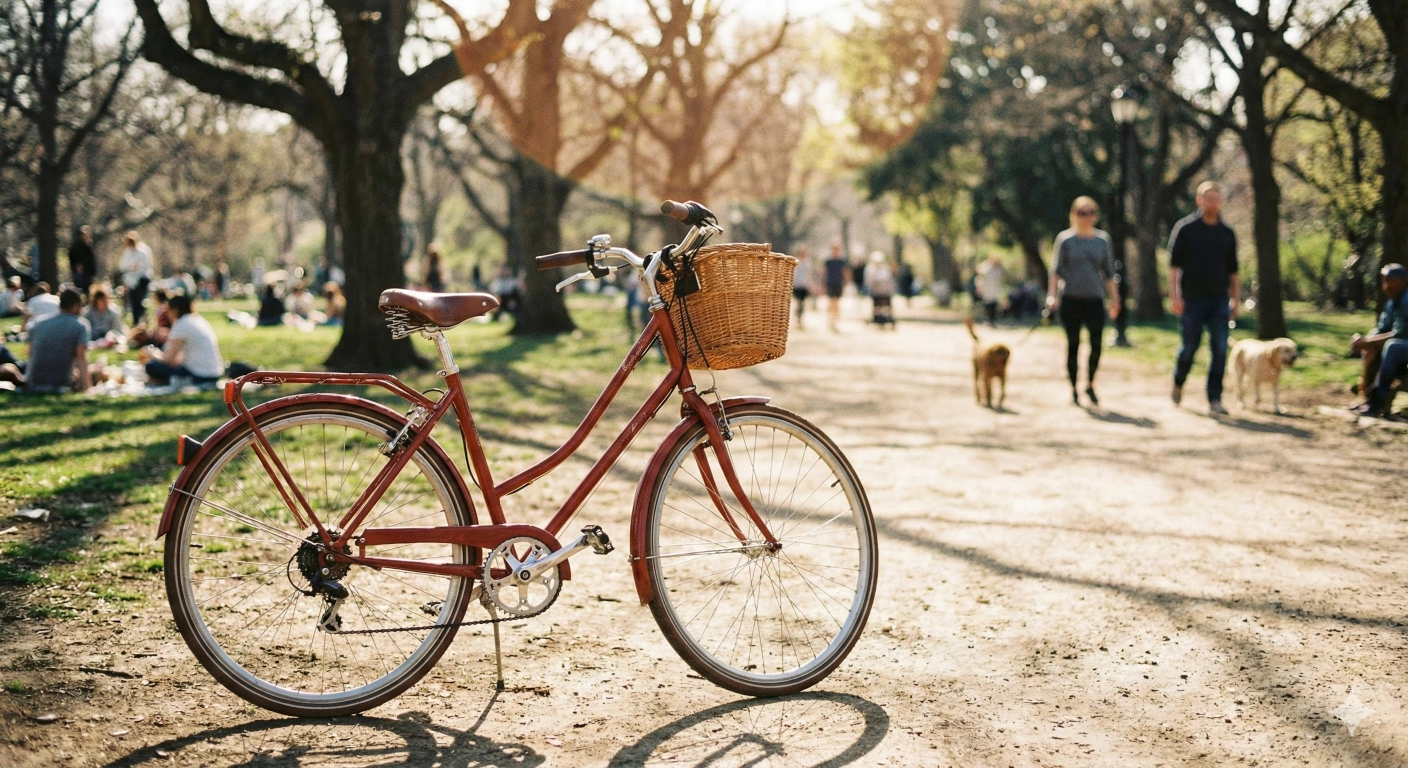
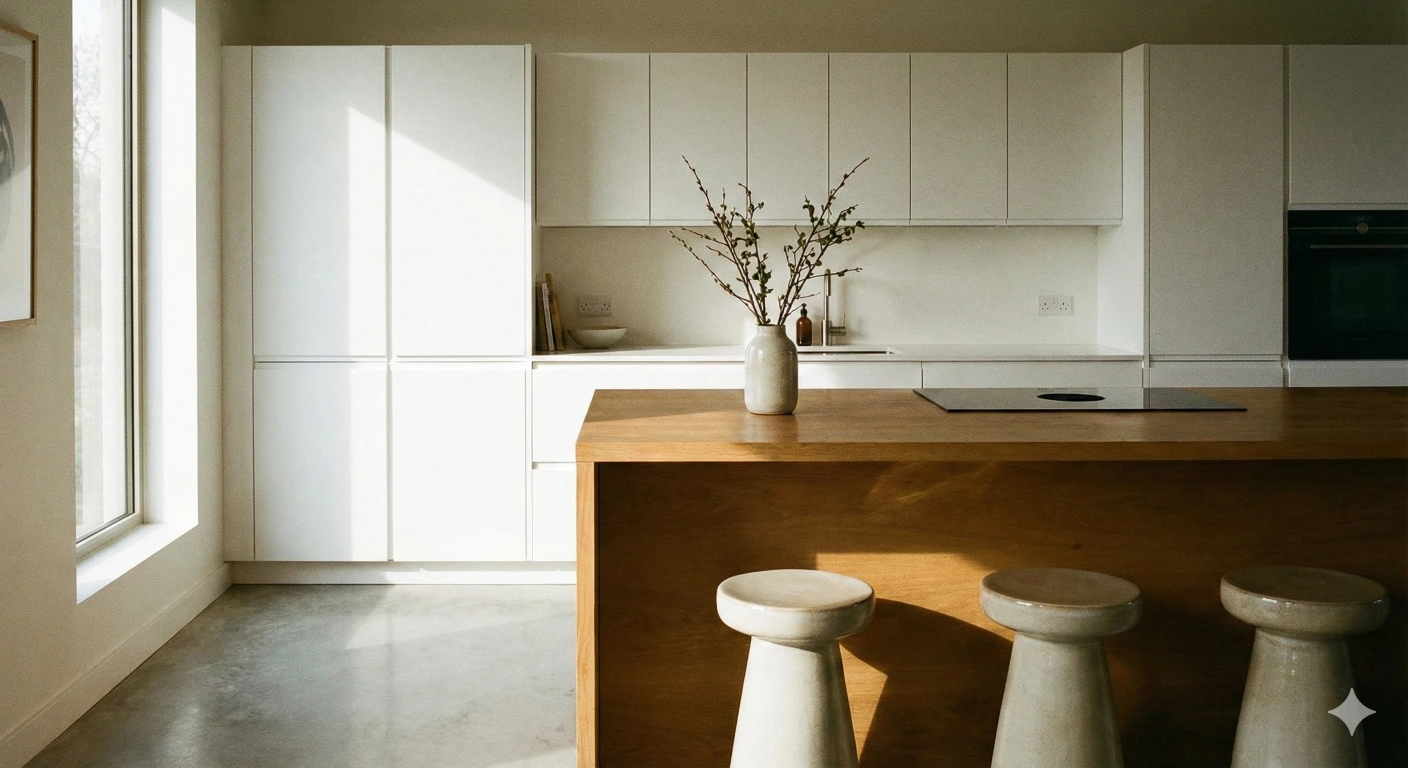
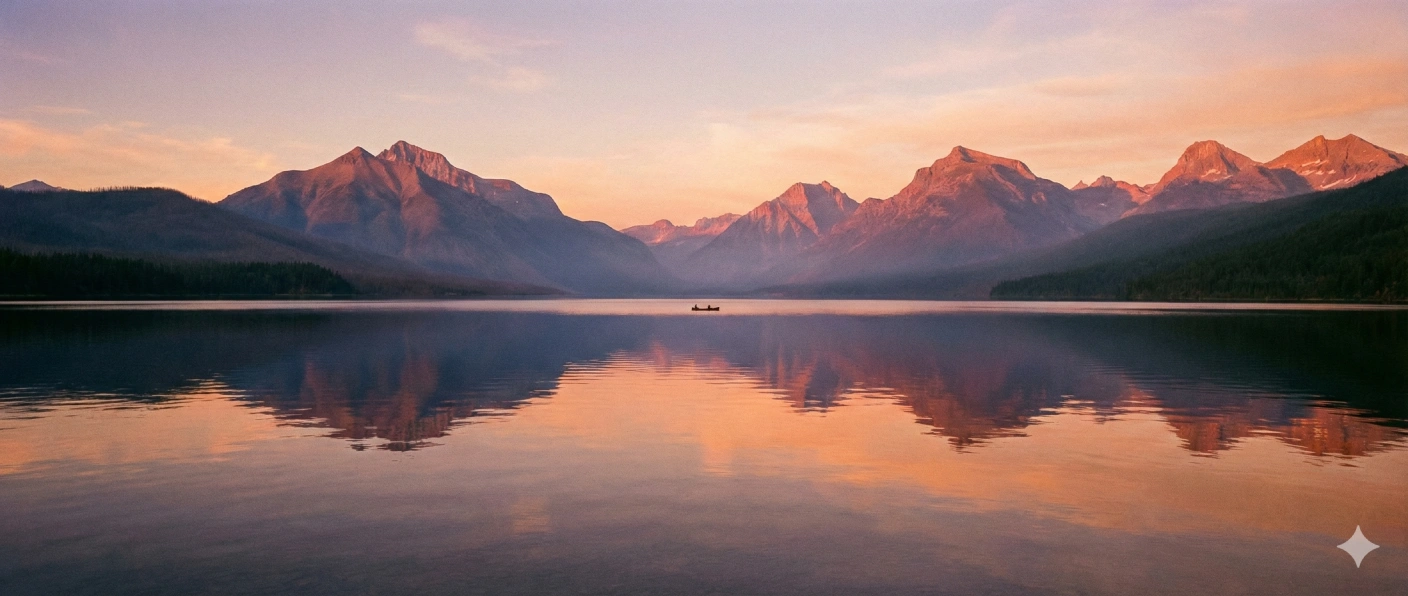
Now that the workflow is clear, experiment with short, concrete prompts. Start simple, then add lighting, angle, and style as needed.
# Simple object, clear setting
"A red bicycle in a sunny park, midday light, shallow depth of field"

# Style and mood cues
"A modern kitchen with clean white cabinets, natural side light, 35mm lens, minimal styling"

# Atmosphere + composition
"A peaceful lake ringed by mountains at sunset, glassy water, wide angle, soft haze"
Save each output with a distinct filename so you can compare results side by side.
If something goes wrong
- No image: Make the prompt visual, specify subject, light, and angle.
- Error message: Confirm your API key, model name, and rate limits.
- Unexpected look: Reword with concrete cues (lens, lighting, material, time of day).
Master prompt engineering
Precision beats length. Describe subject, scene, light, camera, and aesthetic. Use constraints only when needed, then iterate by changing one variable at a time.
Reusable prompt patterns
"Photoreal product photo of a compact 'nano banana' game controller on a charcoal backdrop,
soft top light, subtle edge rim, 3/4 angle, minimal props, neutral palette, 1024x1024"
"Editorial portrait of a robotics engineer in a workshop, key light from camera-left,
practical lights in background, 85mm equivalent, shallow depth of field, natural color grade"
"Cozy reading nook by a window on a rainy evening, warm table lamp, soft reflections on wood,
wide angle, cinematic composition, gentle film grain"
Concise baseline
Use a short, unambiguous description. Ideal for quick ideation and exploring compositions.
"Small yellow wireless mouse on a matte desk, soft top light, 3/4 angle"
Controlled variant
Add lighting, lens, materials, and palette to lock the look for repeatability.
"Studio product photo of a small yellow wireless mouse on a matte slate desk,
soft top light plus faint rim from right, 50mm equivalent, micro-textured plastic,
neutral gray palette, 1024x1024"
Create a reusable helper
Wrap generation and saving in a single function so you can focus on prompts, not plumbing.
This version creates an images/ folder if it does not exist.
import os
from io import BytesIO
from PIL import Image
from google import genai

MODEL = "gemini-2.5-flash-image"

def generate_and_save_image(client, prompt, filename):
  """
  Generate an image and save it under images/{filename}.
  Returns True on success, False on failure.
  """
  try:
    response = client.models.generate_content(
      model=MODEL,
      contents=[prompt]
    )
    os.makedirs("images", exist_ok=True)

    for part in response.candidates[0].content.parts:
      if getattr(part, "inline_data", None) and getattr(part.inline_data, "data", None):
        img_bytes = part.inline_data.data
        image = Image.open(BytesIO(img_bytes))
        path = os.path.join("images", filename)
        image.save(path, format="PNG")
        print(f"✅ Image saved as {path}")
        return True
  except Exception as e:
    print(f"❌ Error: {e}")
    return False

  return False
# Examples
generate_and_save_image(client,
  "A red bicycle in a sunny park, midday light, shallow depth of field",
  "red-bicycle-park.png"
)

generate_and_save_image(client,
  "A modern kitchen with clean white cabinets, natural side light, 35mm lens, minimal styling",
  "modern-kitchen-white.png"
)

generate_and_save_image(client,
  "A peaceful lake ringed by mountains at sunset, wide angle, soft haze, glassy water",
  "lake-mountains-sunset.png"
)
Iteration tip: Change one parameter per run (light, angle, lens, material) and name files accordingly. This makes it easy to compare results and backtrack to the best variant without guesswork.
Be specific, not generic
Specific prompts reduce ambiguity, leading to consistent, professional results. Compare a generic request with a detailed, production-ready description.
generate_and_save_image(client,
  "A kitchen",
  "kitchen_generic.png"
)
generate_and_save_image(client,
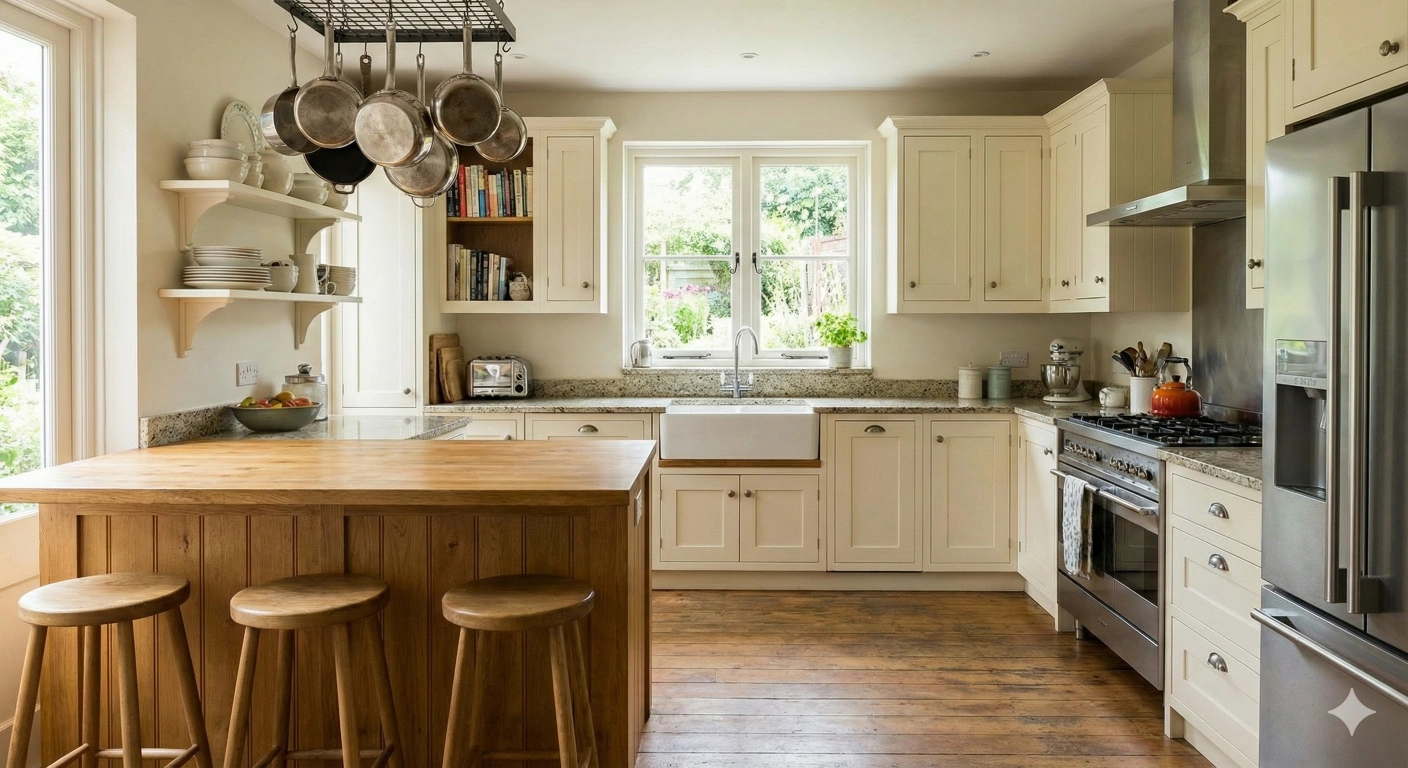
"Modern minimalist kitchen, white quartz countertops, flat-panel cabinets, satin stainless appliances, "
"three slender pendant lights, natural oak plank floors, soft north window light, clutter-free island",
"kitchen_specific.png"
)
Control the camera
Use photography terms to steer framing and perspective. This locks composition and helps repeat a look.
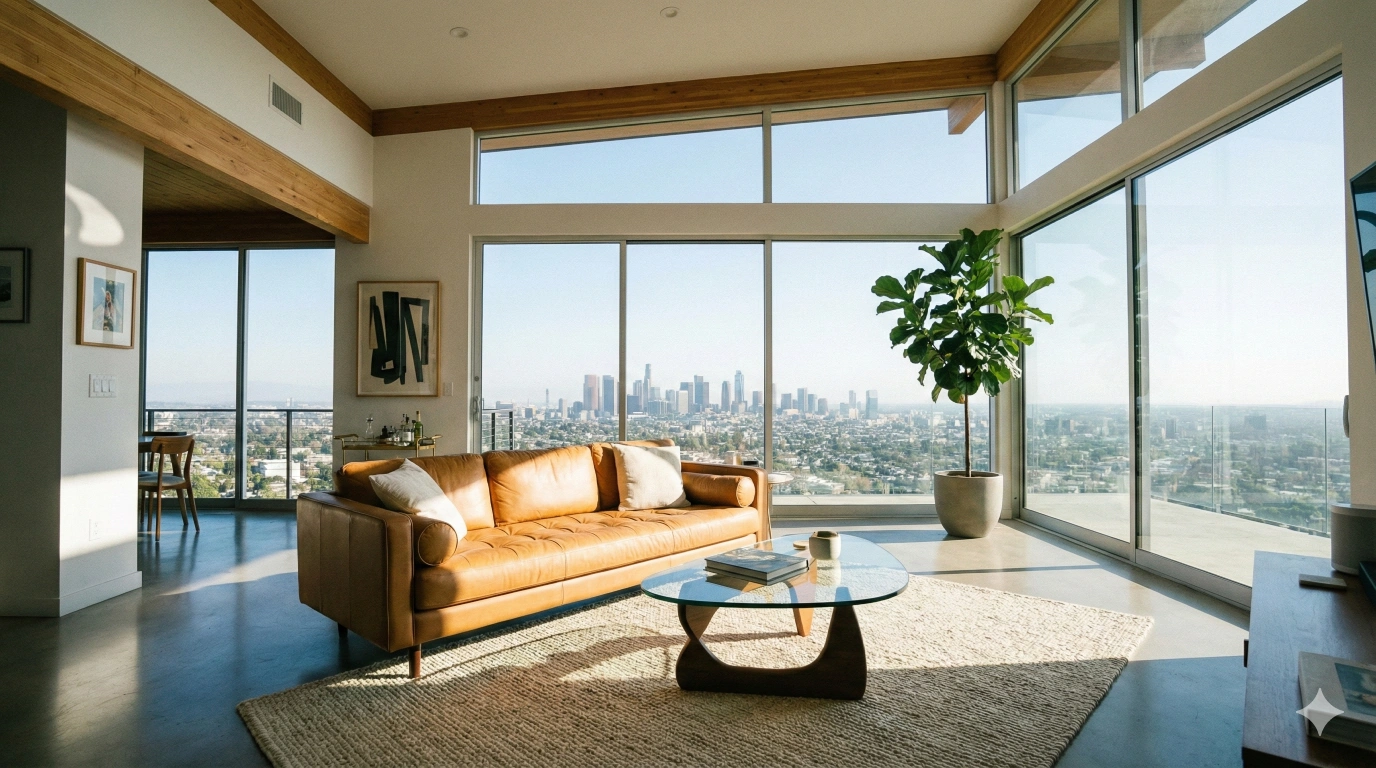
generate_and_save_image(client,
  "Wide-angle view of a contemporary living room, caramel leather sofa, low glass coffee table, "
  "floor-to-ceiling windows with city view, 18mm equivalent, midday ambient light",
  "livingroom_wideangle.png"
)
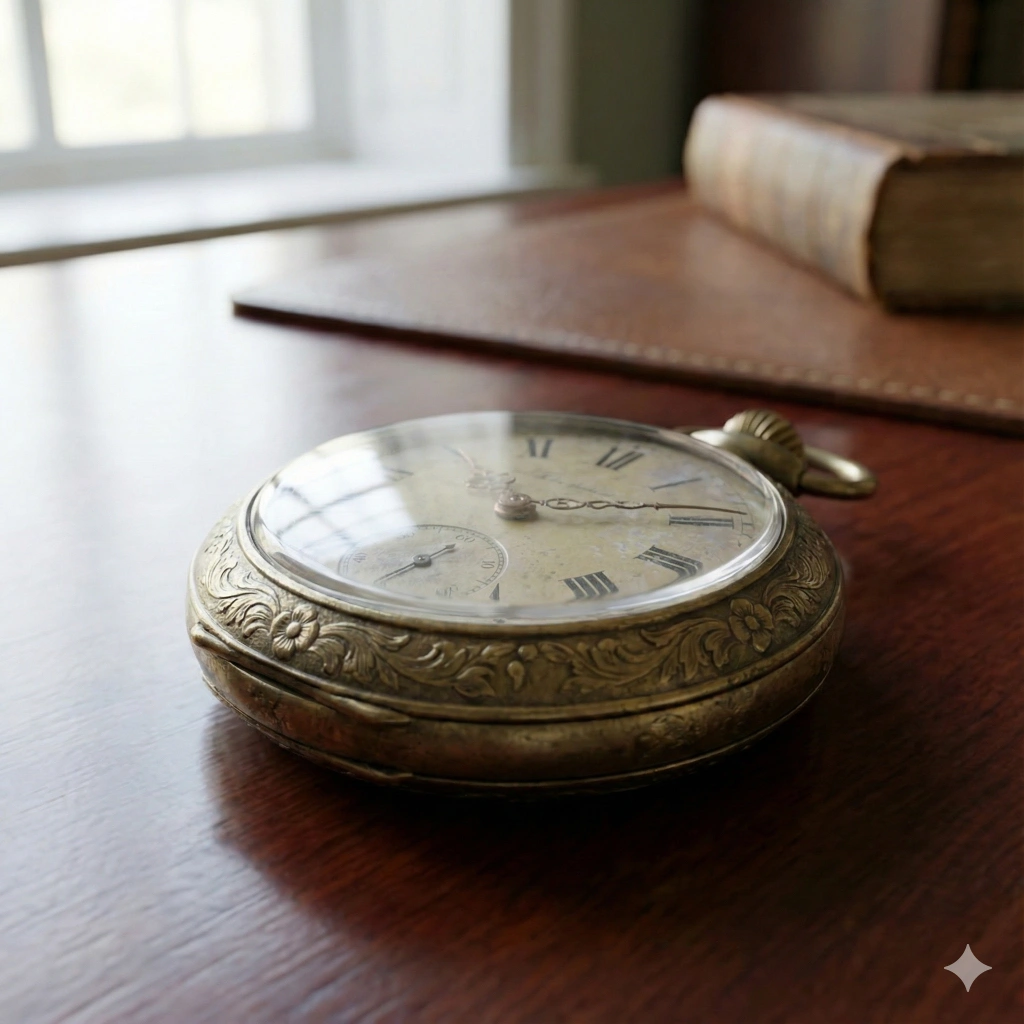
generate_and_save_image(client,
  "Macro shot of a vintage pocket watch on a mahogany desk, engraved brass case, Roman numerals, "
  "soft window light, shallow depth of field, 1:1 reproduction",
  "pocketwatch_macro.png"
)
- Low angle shot: Heroic, looking up to the subject.
- Bird’s-eye view: Plan view for layouts and menus.
- 85mm portrait lens: Natural perspective, creamy background blur.
- Dutch angle: Intentional tilt for tension or drama.
Shape lighting and mood
Light defines mood. Name the source, quality, and direction to guide contrast and color.
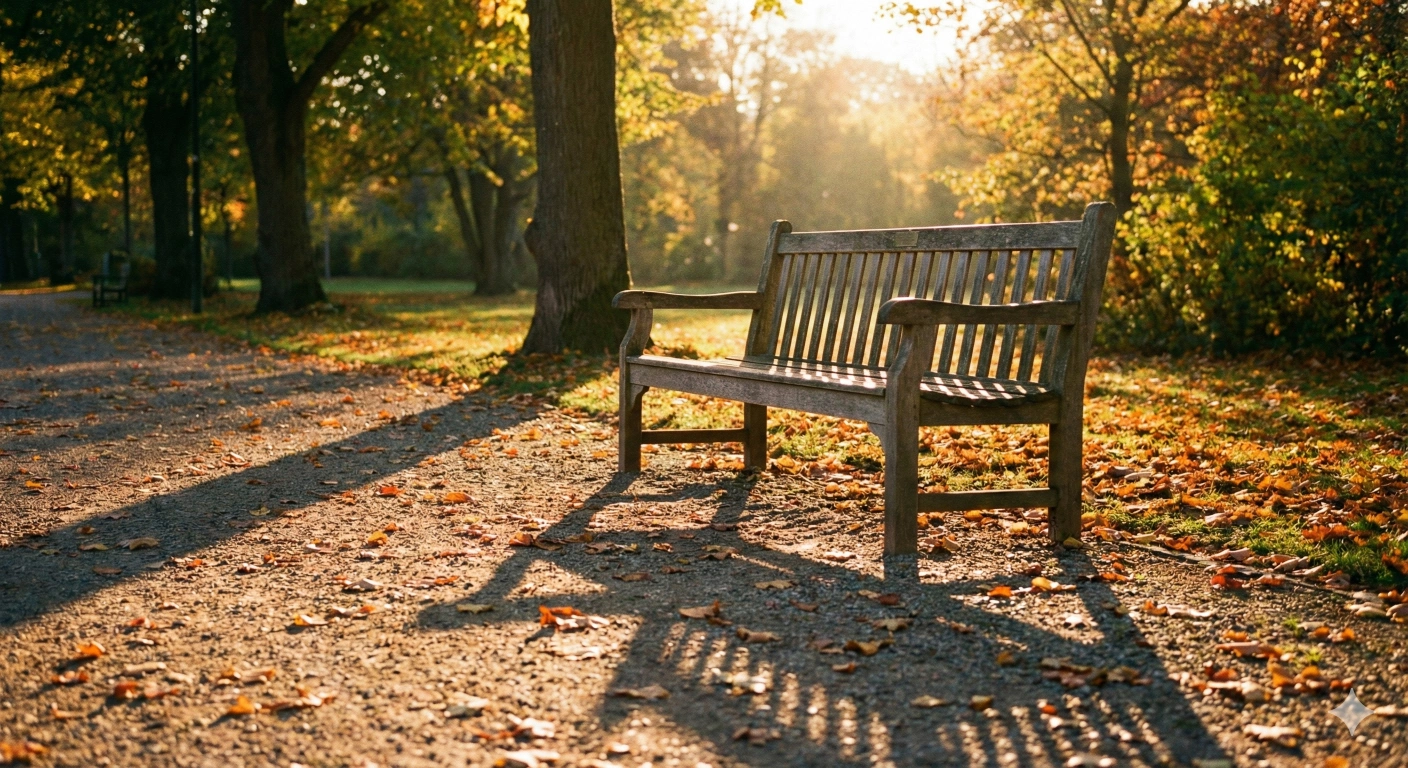
generate_and_save_image(client,
  "Empty park bench at golden hour, warm low sunlight, long shadows on gravel path, "
  "amber leaves scattered, tranquil atmosphere",
  "bench_goldenhour.png"
)
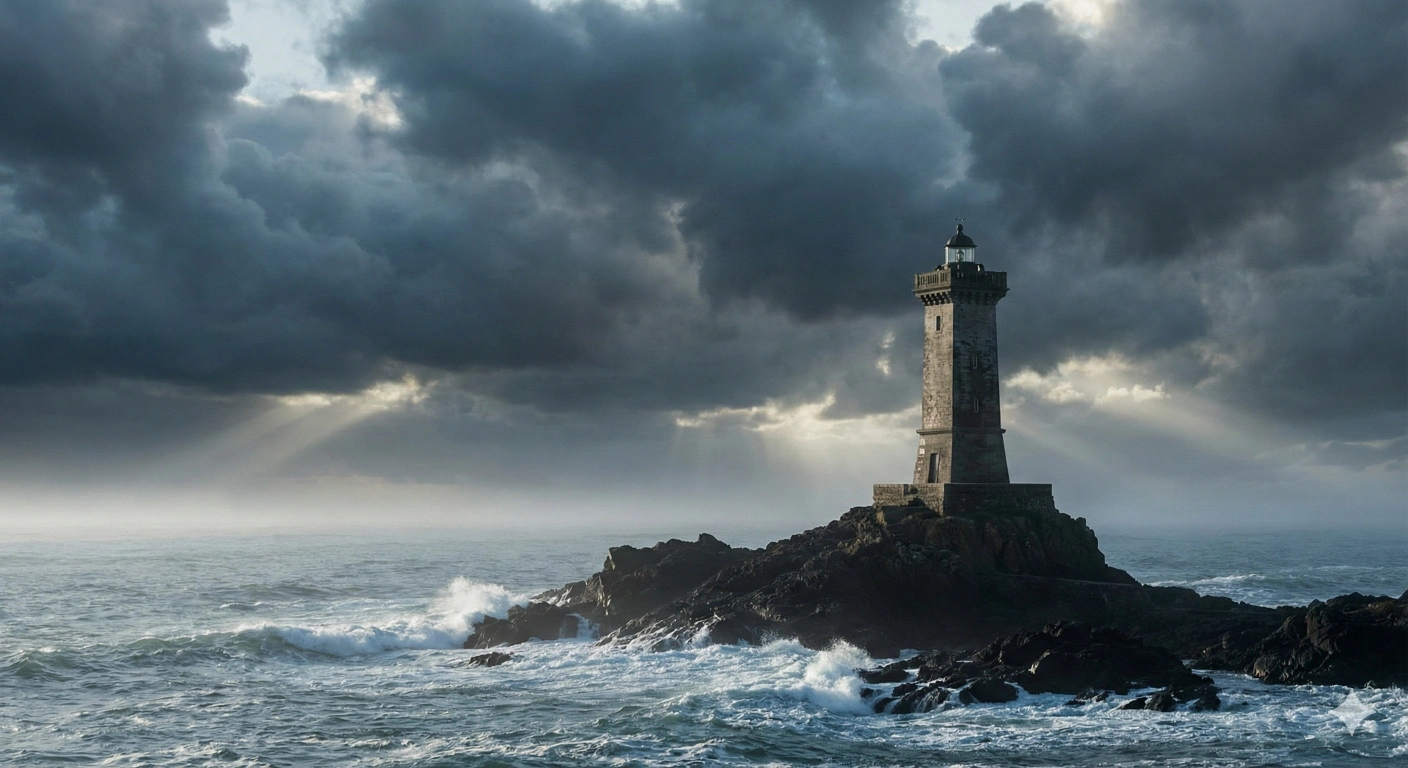
generate_and_save_image(client,
  "Storm front over a solitary lighthouse, dramatic cross-lighting, steel-blue sea, waves breaking on black rocks, "
  "low contrast mist near horizon",
  "lighthouse_dramatic.png"
)
- Soft natural light: Even tone, minimal harsh shadows.
- Hard light: Crisp edges, graphic shadows for impact.
- Backlit: Glow, rim highlights, silhouette risk.
- Studio lighting: Controlled, repeatable, neutral color.
Direct style and aesthetics
Aesthetic labels plus material choices create recognizable looks across a series.
generate_and_save_image(client,
  "Minimalist bedroom, white limewashed walls, low solid-oak platform bed, one leafy plant, linen duvet, "
  "soft north light, uncluttered composition",
  "bedroom_minimalist.png"
)

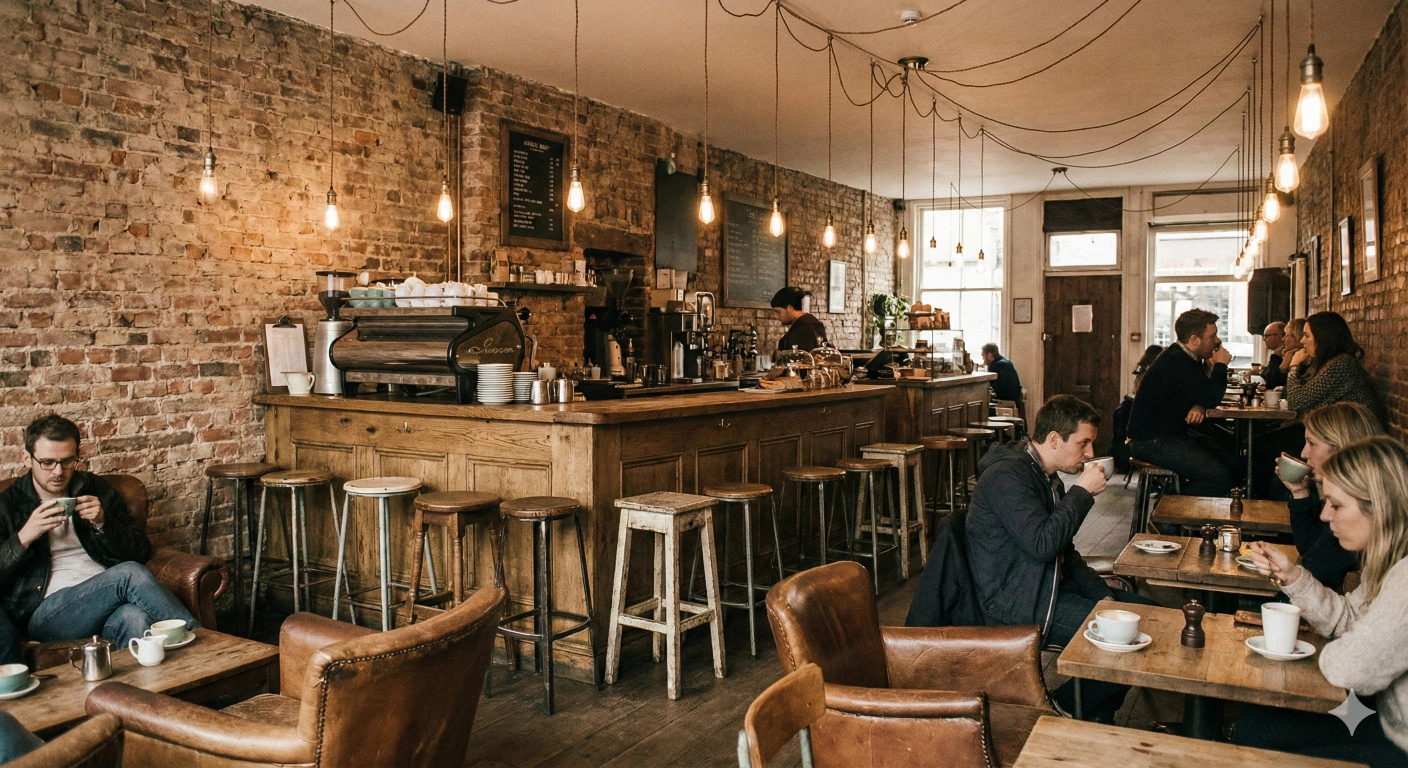
generate_and_save_image(client,
  "Vintage coffee bar interior, exposed brick, mismatched antique stools, Edison bulbs, "
  "weathered oak counter, warm film-like color",
  "coffeebar_vintage.png"
)
- Industrial: Raw steel, concrete, visible fixtures.
- Scandinavian: Pale woods, clean lines, cozy textures.
- Art deco: Geometry, symmetry, metallic accents.
- Rustic: Natural grain, hand-made character, wear.
Add short text inside the image
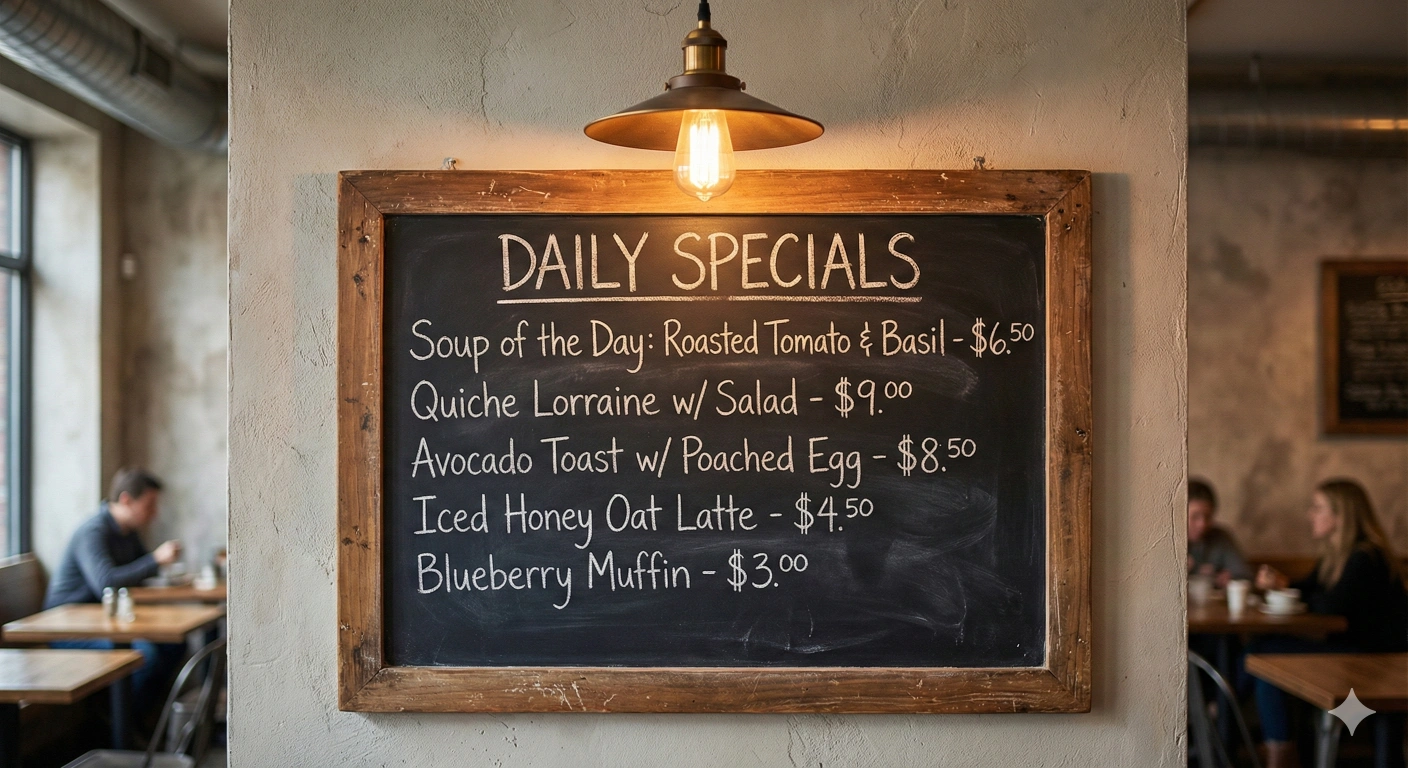
Keep text concise for legibility. Name the medium to guide layout and type treatment.
generate_and_save_image(client,
  "Chalkboard cafe menu with the heading 'DAILY SPECIALS', neat chalk lettering, wooden frame, "
  "warm pendant light, subtle smudges for realism",
  "menu_board_text.png"
)
Combine techniques for control
Layer camera, light, style, and concrete details to lock a repeatable look.
generate_and_save_image(client,
  "Low-angle view of a modern office lobby, dramatic uplighting on ribbed walls, polished marble floor, "
  "geometric coffered ceiling, restrained palette, 24mm equivalent, clean corporate atmosphere",
  "office_lobby_combined.png"
)
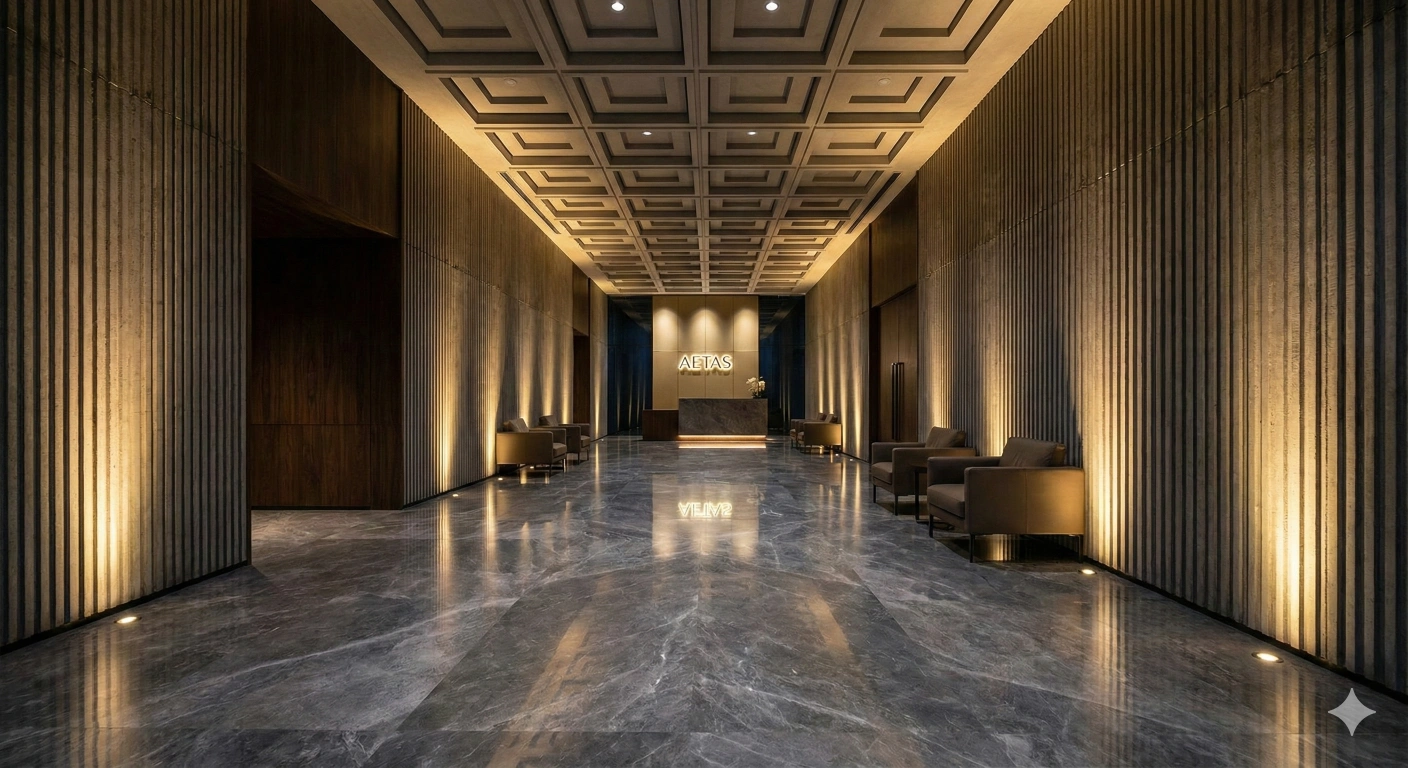
Iteration workflow: Change one variable at a time, save with semantic filenames
(e.g., _angle-24mm, _light-goldenhour), and keep a prompt log.
This makes A/B comparisons fast and repeatable across projects.
Advanced features
With strong prompt habits in place, you can unlock Gemini 2.5 Flash Image features that go beyond single-shot generations: multi-image composition, iterative refinement, character consistency, and style transfer. The examples below use original scenarios and phrasing to keep your results unique.
Multi-image composition
Combine multiple sources and direct how they should relate. Gemini understands objects and context, so it can integrate elements instead of simply blending pixels.
from PIL import Image
from io import BytesIO

# Local base components you prepared earlier
honeycomb_tex = Image.open("assets/honeycomb_texture.png")
mouse_shell   = Image.open("assets/mouse_shell_gray.png")

compose_prompt = (
  "Integrate the hex honeycomb vents into the gray wireless mouse shell, "
  "keeping ergonomics intact, refined gaming aesthetic, clean studio lighting, 3/4 angle."
)

response = client.models.generate_content(
  model="gemini-2.5-flash-image",
  contents=[compose_prompt, honeycomb_tex, mouse_shell]
)

# Extract and save like before (scan response parts for inline image data)
# Add a third element (logo badge) and request cohesive materials
badge_svg     = Image.open("assets/brand_badge.png")

compose_prompt = (
  "Apply this badge to the top shell as a subtle metal inlay, keep honeycomb vents and matte finish, "
  "consistent color palette, soft rim light for contour."
)

response = client.models.generate_content(
  model="gemini-2.5-flash-image",
  contents=[compose_prompt, honeycomb_tex, mouse_shell, badge_svg]
)
Iterative refinement (design sprints)
Work in small, named steps. Preserve structure, then layer focused changes. This mirrors industrial design reviews.
# Step 1: Concept baseline
concept = Image.open("assets/portable_espresso_concept.png")
prompt1 = (
  "Refine this portable espresso maker with a satin graphite body and knurled aluminum dial, "
  "keep overall proportions and control layout."
)
r1 = client.models.generate_content(model="gemini-2.5-flash-image", contents=[prompt1, concept])

# Step 2: Material upgrade
prompt2 = (
  "Replace plastic handle with walnut, add micro-textured grip to the pump section, "
  "maintain the satin graphite body and existing proportions."
)
r2 = client.models.generate_content(model="gemini-2.5-flash-image", contents=[prompt2, concept])

# Step 3: Usability details
prompt3 = (
  "Add a clear pressure indicator ring around the dial and a subtle fill-level window, "
  "preserve walnut handle and graphite finish."
)
r3 = client.models.generate_content(model="gemini-2.5-flash-image", contents=[prompt3, concept])
- Preserve structure: Say “keep proportions” or “do not alter controls.”
- Change one axis: Material, finish, or a single feature per round.
- Name decisions: Use consistent terms so edits accumulate cleanly.
Character consistency (brand mascots)
Keep a mascot’s “visual DNA” stable across scenes and formats. Specify what must remain identical.
mascot = Image.open("assets/yapbot_base.png")

# Retail context
prompt_store = (
  "Show this exact 'YapBot' mascot in a boutique tech store, identical teal visor and hex knee joints, "
  "same face panel proportions, soft ambient retail lighting."
)
r_store = client.models.generate_content(model="gemini-2.5-flash-image", contents=[prompt_store, mascot])

# Packaging mock
prompt_pack = (
  "Place this exact 'YapBot' on product packaging, maintain identical visor tint, limb geometry, and torso ratios, "
  "clean studio background, subtle drop shadow."
)
r_pack = client.models.generate_content(model="gemini-2.5-flash-image", contents=[prompt_pack, mascot])

# App UI spot
prompt_ui = (
  "Use this exact 'YapBot' in a mobile onboarding screen, keep teal visor and hex knees unchanged, "
  "flat background, balanced margins for UI placement."
)
r_ui = client.models.generate_content(model="gemini-2.5-flash-image", contents=[prompt_ui, mascot])
- Lock identity: “This exact character,” then list nonnegotiable features.
- Control ratios: Call out head, torso, and limb proportions.
- Constrain color: Name specific tints and surfaces that must not shift.
Style transfer and transformation
Recast an object’s aesthetic while preserving its structure. This is useful for pitching options to stakeholders.
desk_lamp = Image.open("assets/sculptural_desk_lamp.png")

# Bauhaus modernism
prompt_bauhaus = (
  "Transform this desk lamp into Bauhaus style: primary color accents, tubular forms, matte enamel surfaces, "
  "preserve arm geometry and shade size."
)
r_bauhaus = client.models.generate_content(model="gemini-2.5-flash-image", contents=[prompt_bauhaus, desk_lamp])

# Japandi calm
prompt_japandi = (
  "Transform this desk lamp into Japandi style: natural oak, linen shade texture, warm neutral palette, "
  "keep overall silhouette and hinge positions."
)
r_japandi = client.models.generate_content(model="gemini-2.5-flash-image", contents=[prompt_japandi, desk_lamp])
Pro workflow tips: For compositions and transformations, keep a small “do not change” list in each prompt, reference exact color tints or ratios, and log your prompt with the resulting filename. This creates a repeatable pipeline you can hand off to teammates.
Conclusion
Gemini 2.5 Flash Image gives you fast drafts and precise edits in the same workflow. With strong prompts, stepwise refinement, and a few pro guardrails, you can ship consistent visuals for real projects.
- Describe subject, light, camera, and materials for predictable results.
- Iterate in small steps, preserving structure while changing one variable.
- Use composition to merge sources into coherent products and scenes.
- Lock “visual DNA” to maintain character and brand consistency.
- Log prompts, model tags, and filenames to make work reproducible.
Next steps
- Create a prompt log and naming scheme for assets.
- Build a small library of reusable prompt patterns for your use cases.
- Set up project-level quotas and separate dev/stage/prod keys.
- Add image QA checks (readability, color, crop safety) before publishing.
- Automate batch runs with your helper function and a CSV of prompts.
Pro tip: Keep a short “do not change” list inside prompts when refining or transferring styles. Call out nonnegotiables like proportions, color tints, or typography so edits stay on brand.
FAQ
Do API images include a watermark?
Images generated through consumer chat surfaces may include a watermark. API workflows are optimized for programmatic use. Always verify outputs in your target channel.
What resolution and aspect ratios can I use?
Square 1024 works well for tests. For production, specify width×height in the prompt and keep composition cues (lens, angle) aligned with your target ratio. If a crop feels tight, reduce focal length or widen framing.
How do I keep a character consistent across scenes?
Reference “this exact character” and list nonnegotiables: head–torso ratios, facial geometry, signature colors, and materials. Reuse the same base image in the request and constrain lighting shifts between shots.
Why did my request return text but no image?
The prompt may be nonvisual or violate constraints. Make the request concrete (subject, light, camera), check model name, then scan the response parts for inline image data before saving.
How should I budget costs and quotas?
Run small smoke tests, then batch in controlled groups. Log prompt, model, and output size per run. Monitor usage in your dashboard and throttle batch size to stay within rate limits.
Can I add readable text inside images?
Yes. Keep text short, specify the medium (menu board, label, poster), and request a clean background. If legibility drops, increase contrast, simplify the scene, or shorten the wording.
Denis is the editor-in-chief of YourAIPedia. He reviews AI tools, writes prompt playbooks, and tests automation workflows hands-on, so every guide is based on real setups.. His goal is simple: to help you get measurable results with AI without wasting hours on guesswork.